
A 30 buck bonsai stand
When you are starting off with bonsai, one of the things that quickly comes up is the need for a stand. Moving the trees off the ground helps with air circulation. It reduces the number of bugs that can crawl into your pots from the ground. It helps with drainage of water out of the pot. Many benefits. The downside is.. A bench typically becomes big and heavy. They are difficult to move. Hard to store (If you move your plants to a winter shelter for winter) etcetc. So what to do?
Terry Davis recently showed me an idea for a bonsai stand that does not cost the world to produce. You do not need a carpentry degree to build this stand. And the final result can be moved by a single person. Best of all.. You can put this together in just a few hours (I took only 2 hours to create the bench used in this example build).
What do I need
Toolkit
- (Mitre) saw
- Drill (with drill bit 8mm)
- Spanner
- Carpenters square
- Hammer
- (Carpenters) pencil
- Sponch or brush
- Tape measure
Shopping list

- 10 Wooden slats (Here 22*50mm, 2.10m, bout 16 euro)
- 2 Threaded rods (Here 6mm, 1m, about 2 euro each)
- 6 Nuts, fitting threaded rod (About 60 cents total)
- 6 washers, fitting threaded rod (About 60 cents each)
- Nails, 1 ½ time the length of the wooden slats thinnest thickness (Here 36mm, about 2 euros)
- Wood glue
- Wood preserver (Here: Bruinoleum, about 3 euro)
- Some leftover pavers
Total cost: About 27 euros
Start by making sure you have all the equipment and materials mentioned above as home. Best to start only after you have all the materials to finish the project.
Make the spacers
 In order to keep the individual slats apart, spacers are created by chopping one of the slats in small pieces. For 9 slats you will need a minimum of 8*3 = 24 spacers. In this example I used pieces of 6cm. Start off by cutting one spacer. Then mark down all the other cut-lines using this one piece as standard for size. Cutting may be done in one go using a mitre saw. However, keep in mind that each cut will cost a few mm of wood. So if you mark off all spacers on the wood before cutting, keep in mind that the first piece of wood will be a little bit bigger than the rest.
Attach spacers
 To make sure the bench looks neat, it is important to have all the spacers in exactly the same spot. To this end, first mark the position of the spaces on one slat. Using 3 spacers, I placed them at 30 cm from the edges, and one in the middle. Then take a carpenters square, and using the first slat as guide, mark the position of the spacers on all other slats.
 Prepare the spacers by placing two small nails in each, positions in opposite square. In order to limit the risk of splitting wood, first tap the head of the nail in the wood, before putting the nail in, in the right position. Prepare all spacers this way, using a solid surface to hammer on (The ground would make a very solid base).
In series now attach each spacer to the slats: Put a little bit of woodglue on to outer edges of the spacers, align with the marks on the slats, and hammer the nails into the slat.
Drill holes
 In order to keep the surface of our bench nice and flat, it is important to perfectly align all the holes in the slats and spacers. However, for most people this is nearly impossible to achieve. Therefore we use a drill bit of 8mm, rather than the 6mm minimally required for the threaded rod. Use a special drill bit for wood. They have a pointy centre, allowing for accurate positioning. Drill one hole in the exact centre of each specer, straight through spacer and slat. To determine the exact centre, draw lines from the opposite corners. The centre of the spacer is where the lines cross. When working with long pieces of wood, on a workbench, you can use the clips of the workbench to secure the slats. This way the slats will not rotate or fall down.
Paint with wood preserver
A stand with pots on them which are watered on a near-daily basis will get to endure a lot of moist conditions. As a result the wood may deteriorate quickly. It is therefore important to treat the wood with a preservative. Many different types can be purchased in hardware stores. I still had some leftover from another job, so I used a brown-stain preservative.
Bolt together
 Calculate the final thickness of your stand. In this case, I used 9 slats, and 8 spacers, each of 22 mm. In other words: The total stack of wood is 17 * 22mm = 374mm. As you will place 2 washers and 2 nuts to the end of the rods, add 2 cm to the total length, here this will be 394mm. (Roughly 40cm). Cut the rods to size. Then put one wisher and one nut on one end of each rod. Gently slide all the slats over the rod. Push the whole stack together, and attach the washer & nut on the other side.
Finished!
 The surface of your stand is now done. To get some elevation take a few brick or paving stones and place them under the surface you just created and the stand is done!
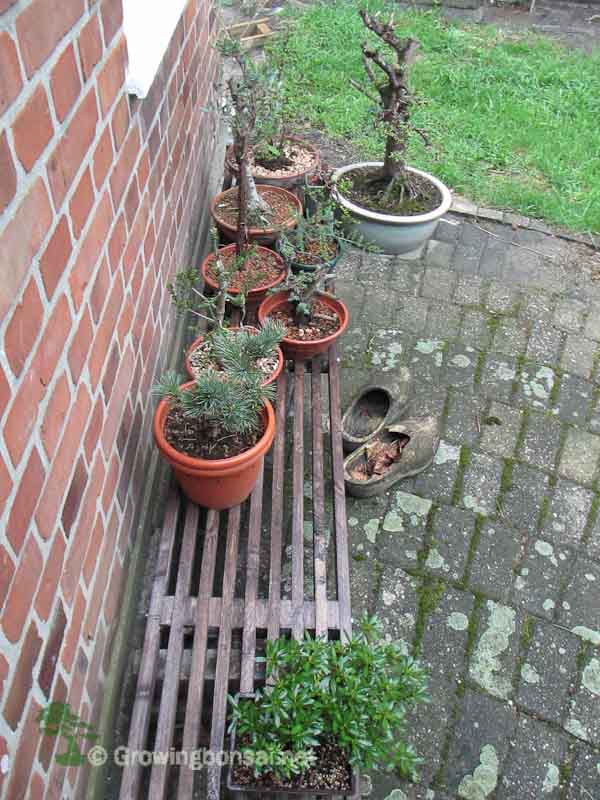

Pretty smart way to come up with a simple stand, and It’s really cheap also!
Great work
This is a GREAT idea! I’m going to go find myself and old pallet to cut up and make one up this weekend!
Thanks for the idea 🙂