
 Growing bonsai from young plants is one of the most rewarding methods to build your own collection. You get a healthy young plant from a nursery. In contrast to growing bonsai from seed, you do not have to spend 2-4 years waiting for it to grow enough bulk to actually look like a tree. A big downside however is that nursery-grown plants have been grown for deep strong roots with a voluminous canopy and quick growth, rather than for the bonsai-characteristics: Stocky growth with a shallow root system. Fortunately, the roots can be corrected and typically it will only take one or two years to grow a new root system. This page deals with the question: “How to grow a good nebari on nursery stock?“.
Before you start such projects, ensure that your plant is healthy. Never ever do major work on a tree unless it is in top condition. The procedures explained here, are a serious hit on the tree, and should not be carried out lightly.
It is important to note that all steps below assume you have a young nursery plant. So something ranging from 2 to 6 years of age. Realize that the practishes shown here may in some cases lead to the death of you tree. The risks are bigger for older trees. Young healthy plants will typically have no real trouble recovering. Ideally this sort of work is carried out at the end of winter, beginning of spring. Basically at the time you would normally repot a bonsai of the species you are working with.
Find a suitable spot
When working on the roots of the tree, it is important to work in the shade, out of the wind. The finest feeder roots and the bark of the roots dry out very quickly. And once that happens, it takes a lot to get the tree going again. So work in a sheltered spot, and place a bucket with water next to you, so you can dip the roots in every once in a while. Note that pines and picea should not have their roots completely washed: the mycorrhiza in the soil are important for a good regrowth. Junipers and Pines in general dislike being bare-rooted, so do not follow the procedures below unless you have no alternative.
Examine the rootball
In the nursery, try to get a quick look at the roots before you buy a plant. Most potted plants can be checked throuh the drainage holes in the bottom, or by carefullly slipping off the pot. Healthy plants have lightbrown/yellow/white roots. Plants with black roots are not healthy and should be left at the nursery.
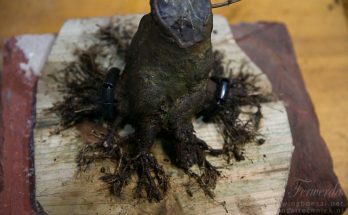
 When you arrive home with a potted plant, or a plant in burlap, you always start off with an examination of the rootball. Pull the pot off the roots. You may have to scratch at the soil on top a little: Typically, potted plants have a few cm of loose soil before the roots start. Don’t be afraid to damage the outer section of the root. I often start off by cutting the bottom half of the roots away if they are really tangled. You do not need the rest of the roots anyway. Once you have relieved the plant of some of the soil, you should be able to see which roots are in the right spot, and which are not. Normally, you would end up with a set of roots like on the image.
Now you can decide upon a method to follow for creating the nebari:
Remove the bottom esection of roots. If the roots at the top of the rootsystem look good to be used as new root system, trim the main root just below this. Think the roots as you would for regulare nebari development.

Technique: Take a strong piece of wire, and wrap this at least twice around the section of the taproot that you want to remove later one. Make sure it is really tight. Now plant the whole plant in a large container of the full ground and allow the plant to grow freely. After a year, dig up the plant and check whether sufficient roots have developed above the tourniquette. If so, clip off all the roots below the wire, and continue the development of the nebari with the new roots.
 Clipping off all the existing roots sounds extreme. And it is. It is however not the death sentence that many people believe it is. Expecially when you do this with young trees, you can develop perfect radial spoke-roots for a picture-perfect nebari.
 Technique: In the picture a few stumps of the roots were left. However, one can go as far as trimming the mainroot straight through, as long as a section of root is left in place. On the areas that have been cut, new roots will form. By placing the cut area on top of a root-barrier (Piece of wood, tile, plastic etc) the your roots are forced outwards, resulting in evenly distributed roots around the main stem. After cutting off the roots (Do this in the middle of winter; What you do here is very similar to taking hardwood cuttings. Removing the roots in winter allows the tree to create callus and form new roots quickly in spring) plant the tree fairly deep in the ground, and keep well-watered. Naturally, protect the plant from permanent frost and wind / strong sun.
The malus in the picture above with only stumps left, was placed over a barrier and left to grow for 24 months. After that I lifted the plant, and trimmed all the roots again. It is clear that the plant has recovered very well. Just note: Such drastic actions cannot be done on all species and not in all locations, and only with the right aftercare (Such as making sure the plant is stable in the ground, and the soil does not dry out). This is what the plant looked like after 2 years of recovery growth. Note that although the number of roots is a lot better, they do not leave the main trunk evenly. However, in between the thick roots, a range of thinner roots can be seen. Before repanting, the thicker roots were cut a bit shorter. The thinner roots were left alone. The main trunk was cut back to 10cm, to start woring on the lower trunk. The plant will get another year or two in the ground, during which the main trunkline will be wired in place.


Hmm it looks like your site ate my first comment (it was extremely long) so I guess I’ll
just sum it up what I submitted and say, I’m thoroughly
enjoying your blog. I as well am an aspiring blog writer
but I’m still new to the whole thing. Do you have any recommendations for first-time blog writers?
I’d genuinely appreciate it.
my site; search engine
Hi Clyde,
Not really. I am just an amateur, writing about some things I like. I have found that you have to stick with it. It may take several months before Google truely indexes your blog, and some visiters start coming.